Tuesday 31 March 2015

Coming soon - April

Like most makers I do sometimes struggle to not get distracted by something new and exciting to work on.  To try and keep myself focused I am going to publish a list of my current projects each month.  You can think of this as my to do list for projects in April, like all to do list I will get about half the things on the list done if I am lucky.  I will also most likely end up doing plenty of other things I had not even thought of yet. Hopefully having a list will keep me on track!  The first few of things are in order of priority after that they are just in the order I thought of them.

  1. Put a roof on the workshop, the sooner I have a proper workshop again the better!
  2. Build my Printrbot, 3D Printer kit.
  3. Build my OneTesla Tesla Coil kit.
  4. Complete my lab frequency standard project.
  5. Finish designing and build my battery tab welder.
  6. Start work designing my lab programmable DC load
Of course this list does not include everything going on at fizzPOP or my work projects. Lets see if publicly making a list helps me stay focused or not.

Sunday 29 March 2015

New Workshop - Walls

Just a quick progress report on the workshop / garage build. Yesterday morningI sat around waiting for the lintel to support the masonry above the segmented up and over door to arrive (it was meant to arrive Friday, but it finally turned up Saturday morning).

So as we stand all the walls are up to eight foot high and the lintel is in above the pedestrian door and the lintel for the garage door is ready and waiting.  Next week we will hopefully get the second lintel in place, build the gable walls up to ridge height and get the ridge beam installed.  If we get everything done and the materials arrive in time works out we will be framing the roof over the Easter break.

Thursday 26 March 2015

DataOn 1640 - On trial - Setting up the test environment. Part 2

In part one we installed our servers and configured our storage pools.  In part two we will build the cluster, create the scale out file server and our SMB 3.0 shares.
  1. Open Failover Cluster Manager and click on validate configuration. Once the wizard has started click next and on the "Select servers or a cluster page add your two servers, in our case labhv01 & labhv02 and click next.
  2. As this is a test environment we can just click next and next two start the validation, if this were a live environment we would have to be mindful of the impact of storage validation. Either way its worth noting that validation is a requirement, along with using certified hardware for this to be a supported configuration. The validation will take quite some time so let it complete.  Once completed you will get a validation report, ours completed with warning but they were because we had unused network adapters that shared the same address, so we ignored these and after making sure the "create cluster" box was ticked clicked finish to start the build.
  3. Once the create cluster wizard has started click next and give your cluster a name, we went with labcl01.  Its now just a matter of clicking through the next's and you should have a working cluster.
  4. Now you have your cluster we need to add our silver storage pool (the gold was added for the Quorum disk).  This should simply be a matter of selecting storage, Pools and clicking on Add storage pools.
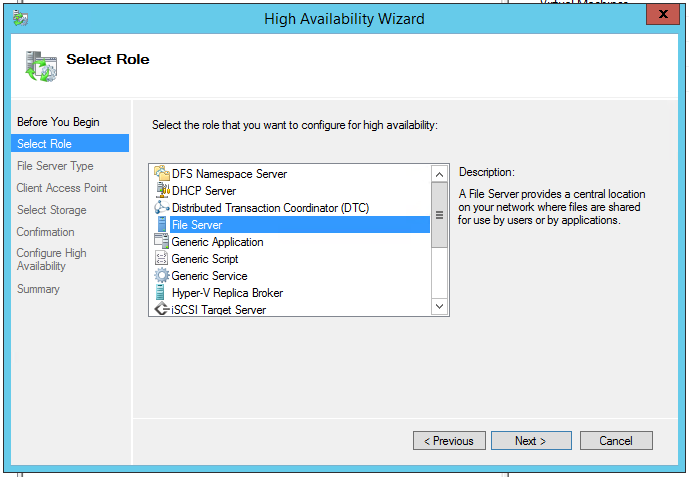
  5. Its now time to add the scale out file server role.  Click on Configure role and once the high availability wizard has started click next and select File server and click next.
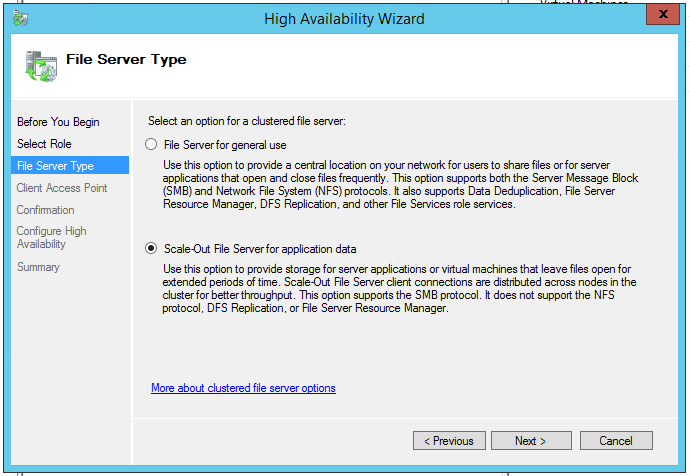
  6. We now need to pick the type of file server as we are gong to use the share to host vm's we will select Scale-Out File Server for application date.
  7. Finally we need to give our Scale-Out File server a name, we called ours labsofs01, its then just a matter of clicking next a few times and at the end you will have a Scale-Out File Server.
  8. Its nearly time to create our file shares but first we need to create a virtual disks and volumes on each of our pools in the same  way as we did before. I opted for a two way mirror for the Gold and parity for the Silver. Make sure you add the volumes to the new SOFS not the cluster or the nodes!
  9. To create your shares, right click on your Scale-Out File Server and click add new file share. On the file share profiles select applications and click next.
  10. Select your server (labsofs01) and the volume you wish to share, in this case volume2 which is our Gold storage.
  11. Give you share a name, gold in our case and click next a couple of time an create and you will have a working share on your Scale-Out File Server.
Next time I will go through the results of our testing and my final thoughts on the DataOn 1640.

Saturday 21 March 2015

Rubidium Frequency Standard - Testing

Now I have this thing I guess I better check it works.  Luckily it had  pin out on the side and the data sheet was easily found on the internet so setting it up was pretty straight forward. According to the data sheet it needed a supply of between +19v and +32v (+24Vdc nominal) capable of 1.7Amps.  For the test I used my bench supply, the positive connects to pin ten and the return to pin eight.  You also need a way of knowing when the standard has locked, this done by measuring the voltage of pin 6, I opted for a multimeter but you could just as easily used another channel on your scope.  Finally you need a method of measuring the out put, I used my TTi TF830 frequency counter and my Rigol DS1054Z Oscilloscope.  These were connected to pin 1.

So time for the moment of truth, I powered up the standard, and it drew about 1.5 Amps for the first two or three minutes then it dropped down to 0.47 Amps once it had reached temperature.  A few moments later the voltage on the lock pin (its labeled BITE on the pin out) dropped from 4.7V to just above 0V indicating it had locked. During it reaching lock the the counter had been varying its readout by a few tens of hertz once it reach lock it kept flipping between 9.9999999 and 10Mhz.

After a further ten minutes it displayed 10Mhz continually.  I am inclined to believe that this final 1hz variance was down to the counter having not yet reached temperature as it had only just been switched on rather than any change in the output of the standard.

It is also worth noting that neither the scope or my counter have an oscillator any ware near as consistent at the standard so I am taking there readings with a pinch of salt although things look good.  All in all I think its safe to say the Frequency Standard works.

Next stage will be to build an enclosure and power supply, I may also add a couple of buffers and maybe a divider to get a 1hz pulse as well.

Thursday 19 March 2015

DataOn 1640 - On trial - Setting up the test environment. Part 1


As you should of seen in my previous DataOn related posts we are setting up a pretty simple single enclosure dual Storage Spaces server test environment.  I will be splitting this into a couple of posts, the steps below will take you through how we did the basic Storage Spaces config, the second post will cover the creating of the cluster,your scale out file server and your shares. They are not a complete detailed guides so you will still need to use your common sense.

  1. Fit the HBA's in each of your host nodes if not already fitted, we are using LSI - SAS 9207-8E 6Gb/s models. You will need to connect one port from each of the controllers in the DataOn 1640 to each of host nodes.  Bear in mind for a production deployment you would want to use two HBA's per server to provide resilience to a card failure and multiple (minimum is normally three) DataOn 1640 enclosures so your system can survive the failure of a whole enclosure.

  2. Our enclosure came populated with disks, if yours didn't now's the time to install them in the caddies and add them to the enclosure.

  3. Install your OS (Windows Server 2012 R2) on your two hosts nodes, we have named ours labhv01 & labhv02 and join them to your lab environment domain controller, if you do not have have an existing domain controller in your lab you will need to create one.

  4. Add the necessary roles and features on each of your host nodes.  You will need to install the Hyper-V & File Server Roles, along with the Failover Clustering and Multipath I/O Features.

  5. At this point if you open up File and Storage Services in Server manager and view your physical disks you may see they are showing up twice.  This is because we have not yet enabled MPIO support for SAS devices.This can be done by simply opening MPIO properties and ticking the "Add support for SAS devices" box.  Be aware this does however require a reboot.

  6. Once everything has rebooted its time to create your Storage Pools. For this Lab environment we chose to create a "gold" pool with the SSD's and 15k turbo boost drives.  We also created a "silver" pool with the remaining 10k drives.  Creating the Storage Pools is just a simple matter of right clicking on the Primordial Space in the Storage Pane and selecting new pool, and following the on screen steps.


  7. You then need to create your virtual disks. To do so, right click the Storage Space you wish to create the Virtual Disk on, in this case our Lab Test Pool Gold and click New Virtual Disk. In the Storage Pool Window make sure the correct pool is selected and click next.

    Give the disk a name, we called ours Quorum (this will be explained tomorrow) and as we have the SSD's available we will tick the "Create storage tiers on this virtual disk" then click next.
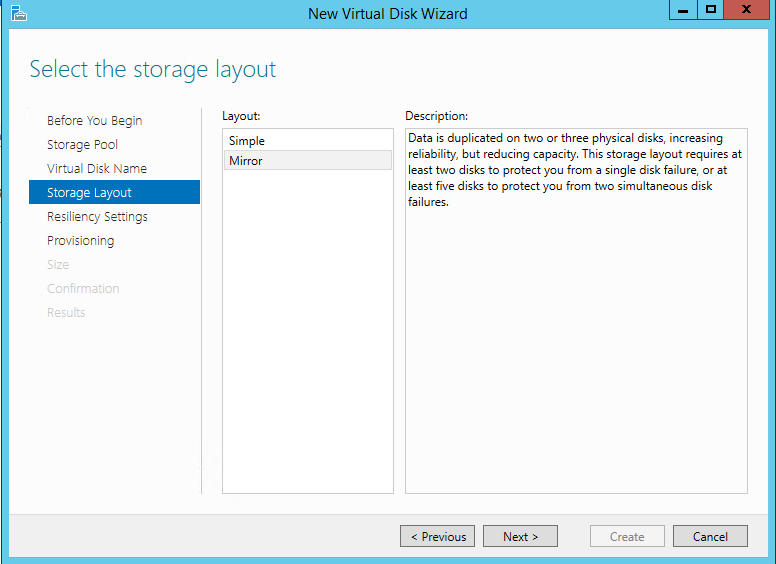
    Then set the storage layout, we have opted for a mirror.
    We will set the resiliency to Two-way mirror and we will keep to the defaults in the provisioning section.
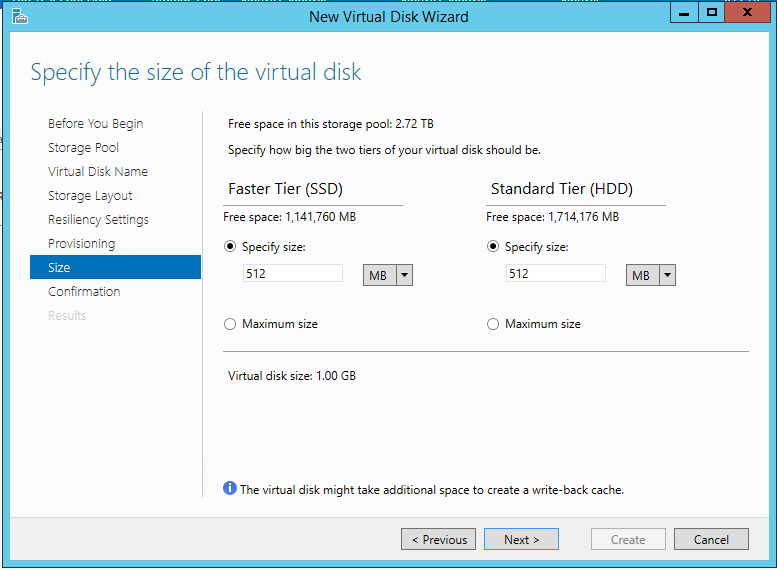
    As we chose the tiers option earlier we will have to select how much SSD and how much HDD we wish to allocate, we have opted for 512Mb of each.
    Its just then a matter of next and confirm.
In the next of these posts we will build the cluster, create the scale out file server and our first shares.

Tuesday 17 March 2015

Rubidium Frequency Standard - The basics

Today the rubidium frequency reference I purchased on eBay arrived from Australia after only eight day which was surprisingly quick. In fact so quick I have not got round to sorting out the other bits and pieces I need to make my lab frequency standard.  In the mean time here is a brief description of what it is and why I wanted need one.

What is it?

The device in question is a Datum LPRO-101 10Mhz Frequency Standard, the manual for which can be found on-line pretty easily for those of you who want the detail but in a nut shell it outputs a very stable 10Mhz signal . Note this is not a primary reference like a caesium atomic clock or a hydrogen maser, but a secondary reference, i.e. it needs to be calibrated but once it is it holds its frequency with a very high degree of stability. As always there is lots more information on the internet, for a basic overview I would start with Wikipedia.

Why do I need one?

Well to be honest I probably don't need one but it does have lots of uses.  One of the main reasons I want one is to improve the accuracy of some of my test gear, in particular my universal counter which does not have an oven-controlled crystal oscillator but which can take a 10Mhz external standard input, this would increase its accuracy significantly.  I also fancy building a very accurate stand alone NTP server, but I guess the main reason is so I can say I have my own atomic clock.

Ok I'm sold how can I get one?

Rubidium frequency reference's can be purchased brand new for around £1700 pound which is way out of my budget, they do however come up quite frequently on ebay, these are normally second hand units removed from mobile phone base stations or SDH equipment.  Either way they tend to go for between £100 and about £150 pounds.

Once I have all the parts I will build the lab standard, this will really just consist of a PSU, lock monitoring circuit and maybe a divider to get other frequencies, I will most likely be publishing how I built it as an Instructable.

Monday 16 March 2015

DataOn 1640 - On trial - First impressions

Well having got every thing unpackaged, time for my first impressions. I will also be explaining the lab environment I will be using for my tests.

Hardware

At first glance this is a solidly built piece of kit. I am surprise how compact it is measuring just 470mm deep, it is how ever worth noting this thing is heavy and will definitely a two man install.

All models include dual power supply's but  the model I have on test is the DNS-1640D also includes two SAS I/O Modules for I/O redundancy. I believe all versions come fully populated with drive caddies and adapters to enable the installation of SATA drives are also available.

Each of the SAS I/O Modules has three SFF-8088 SAS connectors. Two are labelled in and one out, although I have been told that they can all be used as either inputs or outputs.  There is also a rj45 socket but the manual says they are for factory use only.

The only real negative I will mention and I do feel I might be being ultra picky I would say the clips on the disc caddy's are a little bit on the flimsy side of things compared with the likes of HP.  Having said that I do not envisage the disks being swapped on a regular basis.

Lab Environment

For my test environment we are using a pair of HP DL360's running Windows Server 2012 r2 as our Hyper-v Cluster nodes which we will be using for our Scale Out File Server. We will be using our existing lab cluster for all of the other required servers such as the DC, and test load VM's.  Below is a diagram of the environment.

Its worth noting we are not trying with this setup to run the performance to the maximum. Quite frankly our lab servers are not up to the job.  We will be concentrating on how this works with Storage Spaces, SOFS and how it well it copes with the downing of a SOFS node.  This will not be an in detail step by step how to but I will try and point you in the right direction of how you could set this up yourselves.

So next time I will explain how we configured our test lab environment.

Sunday 8 March 2015

Wythall Radio Rally

Today I spent a very enjoyable morning mooching around Wythall Radio Rally with a couple friend from fizzPOP, I wish i had know about this event before, this was apparently its 30th year so there really is no excuses.  I will however look on the bright side and think of how much money I have saved.  Having said that I managed to limit my spending, although it was a close run thing and I nearly ended up being a lot poorer as I spotted a HP bench multimeter I really liked the look of, I decided to have a think and when I went back it was gone.  I ended up coming away with just a TTi 1.3Ghz frequency counter for just £30 (something I have been looking for on ebay for some time).

I also ended up purchasing  23 25v 22000uf capacitors, he wanted £1 each but I managed to talk him down to £15 for the lot.  Whilst they are a little lower capacitance than I had been looking for the will hopefully be suitable for my battery tab welder project which I will be starting as soon as the SCR I have ordered on eBay arrives.


Saturday 7 March 2015

High Voltage - Gaussfest 2015

Well for once on a blog called High Voltage Fun, this post is about high voltage stuff. Today I went to Tesla Coil event, Gaussfest 2015 in Nottingham for the first time.  We saw some really impressive Tesla Coils, although I was surprised that there were not many SSTC's it was definitely a rotary spark gap heavy environment, not that that is a bad thing.

I took the opportunity to speak to many of the builders and had some very interesting conversations and gained some new knowledge. I will definitely be going next year and hopefully I will have something interesting to bring along.

Thursday 5 March 2015

DataOn 1640 - On trial for SOFS and Storage Spaces

At work we have been investigating storage solution based on Microsoft Scale Out File Server and Storage Spaces.  We have just managed to scure on loan a DataOn 1640 for test and evaluation along with a selection of disks, cables and HBA's all courtesy of VA Technologies.

We are evaluating this both for internal use and for client deployments. Utilizing Storage Spaces and Scale Out File Server we hope to supplement our HP SAN and Starwind software based solutions we are currently offerings our clients.

VA technologies have shipped us the following:

  • 1 x DataON DNS-1640D - 24 Bay 2.5" 2U Enclosure
  • 2 x LSI - SAS 9207 - 8E 6GB/s HBA's
  • 4 x Startech (1m) External SAS 8088-8088 Cables
  • 6 x Seagate 600Gb 15k 12gbps SAS Hard Drives with Turbo Boost
  • 6 x Seagate 900Gb 10K SAS Hard Drives
  • 3 x Seagate 1200 SSD 800Gb 12gbps SAS SSD
These together with the servers currently in our normal lab enviroment should make for a pretty speedy storage solution. Over the next couple of weeks I will be posting on how the trial goes, and conclusions reached. 

Monday 2 March 2015

Instructables - Makita 18v LXT Lithium ion Battery-Repair

I have just had my Instructables on how to replace the control board on Makita Lithium-Ion batteries accepted  for there Tools Contest.  Please take a look by following the link below and vote by clicking on the vote tab on the right hand side if you wish!

Makita 18v LXT Lithium-ion Battery Repair


Sunday 1 March 2015

Hyper-v - Virtual machines randomly losing their network connections.

I don't normally write on IT issues in my blog as that's far too much like work but I decided that I would make an exception in this case as several clients have employed us to resolve these issue of late and I felt it could be helpful.

I have based the write up on a typical config we have seen this issue with.  A brand new cluster of four HP DL360 Gen8 using Microsoft Hyper-v Server 2012 R2 and SMB storage on a DL380 Gen8 running Windows Server 2012 R2

The Issue

Virtual machines suddenly lose network connectivity, normally just one at a time.  Moving the machine to another node in the cluster will fix the issue and they will continue to work even when moved back until the next time it happens.  At first an issue with the physical switch was suspected but quickly disproved.  We then looked at the hyper-v virtual switch but once again that seemed petty easy to discount.  We were also briefly sent down a dead end of a MAC address clash.

The Cause

After a lot of research we finally go to the bottom of the issue. It would appear there is an issue with various network adapters in particular those using a Broadcom chip and Microsoft's implementation of VMQ.  The issue mainly seems to come to light if you are using NIC teaming but we have seen it without.  The odd thing is that there is a lack of consistency in what seems to cause it, although having everything patched to the latest levels seems to help.

The Solution?

Whilst there are solutions touted one the web such as installing KB2887595-v2 we have found them all at best a bit flakey, in some cases they seem to introduce a real performance hit in others they just don't work at all. For now we are relying on a simple work around.

The Work Around

The work around (I wont call this a fix as involves disabling a useful feature) is to disable VMQ on the physical network adapters on your Hyper-v hosts.  The simplest way of doing this is with the following Powershell where ethernet1 is replaced with the name of the network adapter in question.

Disable-NetAdapterVmq –Name ethernet1

You will also need to make sure that Enable Virtual Machine Queue is unticked in each guest VM's settings.

Going Forward

Hopefully there will soon be a long term solution to the issue.  In the meantime we are no longer specifying the HP NC365T adapters.  There does seem to be a few more options out there but for now we will be sticking with disabling VMQ.