Showing posts with label DataOn. Show all posts

Sunday, 5 April 2015

DataOn 1640 - On trial - Final Thoughts

So before we get to the specifics about the DataOn 1640, a few words about SOFS and Storage Spaces.  In short I'm really impressed, I had played with them both in a visualized lab environment but this was the first time I had used them with physical hardware.  Up until now we have been using internally and selling solutions either based on Starwind or HP Storageworks, in the future I thing in most cases my first port of call will be SOFS and Storage Spaces.  Its quick and simple to setup and does not require any propitiatory hardware or software.  The other big benefit is that its very simple to expand for extra capacity and or performance.

There are however a couple of issues with going down this route.  The main one seems to be persuading clients that this really is faster than there existing iSCSI solution (in fact in may cases we have found it faster them Fiber Channel based solutions as well).  The other is the usual difficulty of getting people to spend money on a software based solution, they just seem happier to spend money on hardware (often because they can get asset finance.

DataOn
Back to the DataOn hardware its self. First of all its worth noting this is a very simple device, it does very little, but what it does it does very well.  There really is very little you can say about it, other than that through out our testing it performed flawlessly.  As I mentioned previously the disc carriers are a little flimsy but other than that the build quality is excellent.  Its worth noting that HP have now got there 3700 series enclosures certified so this is certainly an option and we will be testing them soon. Going that route however does mean you would need to buy discs via HP at up to a three times price premium although if you already have HP disks to transplant that could be a Bonus for you.

So to sum things up, at the risk of jumping the gun before we have had the opportunity to test the HP 3700 I think we will permanently adding a DataOn 1640 to our lab and subject to further testing going well we will be recommending the DataOn 1640 in future to our clients.

Thursday, 26 March 2015

DataOn 1640 - On trial - Setting up the test environment. Part 2

In part one we installed our servers and configured our storage pools.  In part two we will build the cluster, create the scale out file server and our SMB 3.0 shares.
  1. Open Failover Cluster Manager and click on validate configuration. Once the wizard has started click next and on the "Select servers or a cluster page add your two servers, in our case labhv01 & labhv02 and click next.
  2. As this is a test environment we can just click next and next two start the validation, if this were a live environment we would have to be mindful of the impact of storage validation. Either way its worth noting that validation is a requirement, along with using certified hardware for this to be a supported configuration. The validation will take quite some time so let it complete.  Once completed you will get a validation report, ours completed with warning but they were because we had unused network adapters that shared the same address, so we ignored these and after making sure the "create cluster" box was ticked clicked finish to start the build.
  3. Once the create cluster wizard has started click next and give your cluster a name, we went with labcl01.  Its now just a matter of clicking through the next's and you should have a working cluster.
  4. Now you have your cluster we need to add our silver storage pool (the gold was added for the Quorum disk).  This should simply be a matter of selecting storage, Pools and clicking on Add storage pools.
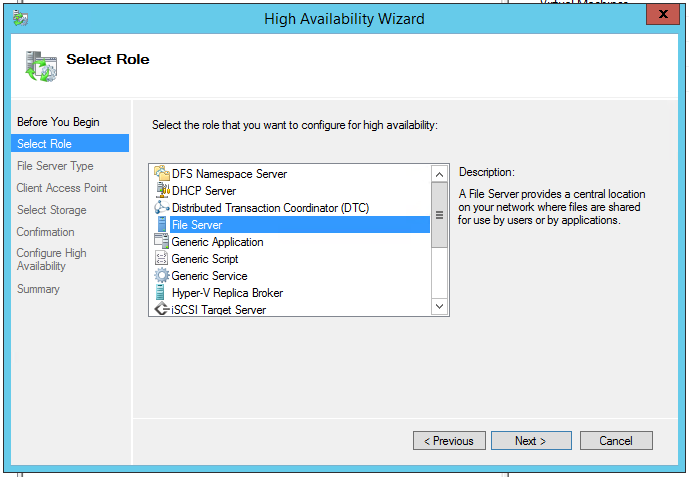
  5. Its now time to add the scale out file server role.  Click on Configure role and once the high availability wizard has started click next and select File server and click next.
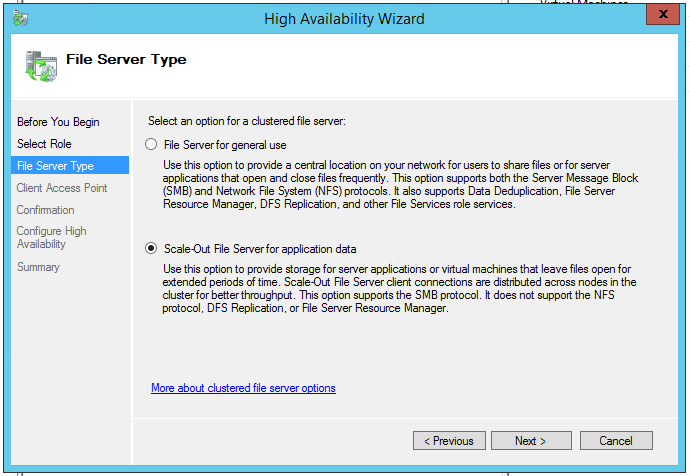
  6. We now need to pick the type of file server as we are gong to use the share to host vm's we will select Scale-Out File Server for application date.
  7. Finally we need to give our Scale-Out File server a name, we called ours labsofs01, its then just a matter of clicking next a few times and at the end you will have a Scale-Out File Server.
  8. Its nearly time to create our file shares but first we need to create a virtual disks and volumes on each of our pools in the same  way as we did before. I opted for a two way mirror for the Gold and parity for the Silver. Make sure you add the volumes to the new SOFS not the cluster or the nodes!
  9. To create your shares, right click on your Scale-Out File Server and click add new file share. On the file share profiles select applications and click next.
  10. Select your server (labsofs01) and the volume you wish to share, in this case volume2 which is our Gold storage.
  11. Give you share a name, gold in our case and click next a couple of time an create and you will have a working share on your Scale-Out File Server.
Next time I will go through the results of our testing and my final thoughts on the DataOn 1640.

Thursday, 19 March 2015

DataOn 1640 - On trial - Setting up the test environment. Part 1


As you should of seen in my previous DataOn related posts we are setting up a pretty simple single enclosure dual Storage Spaces server test environment.  I will be splitting this into a couple of posts, the steps below will take you through how we did the basic Storage Spaces config, the second post will cover the creating of the cluster,your scale out file server and your shares. They are not a complete detailed guides so you will still need to use your common sense.

  1. Fit the HBA's in each of your host nodes if not already fitted, we are using LSI - SAS 9207-8E 6Gb/s models. You will need to connect one port from each of the controllers in the DataOn 1640 to each of host nodes.  Bear in mind for a production deployment you would want to use two HBA's per server to provide resilience to a card failure and multiple (minimum is normally three) DataOn 1640 enclosures so your system can survive the failure of a whole enclosure.

  2. Our enclosure came populated with disks, if yours didn't now's the time to install them in the caddies and add them to the enclosure.

  3. Install your OS (Windows Server 2012 R2) on your two hosts nodes, we have named ours labhv01 & labhv02 and join them to your lab environment domain controller, if you do not have have an existing domain controller in your lab you will need to create one.

  4. Add the necessary roles and features on each of your host nodes.  You will need to install the Hyper-V & File Server Roles, along with the Failover Clustering and Multipath I/O Features.

  5. At this point if you open up File and Storage Services in Server manager and view your physical disks you may see they are showing up twice.  This is because we have not yet enabled MPIO support for SAS devices.This can be done by simply opening MPIO properties and ticking the "Add support for SAS devices" box.  Be aware this does however require a reboot.

  6. Once everything has rebooted its time to create your Storage Pools. For this Lab environment we chose to create a "gold" pool with the SSD's and 15k turbo boost drives.  We also created a "silver" pool with the remaining 10k drives.  Creating the Storage Pools is just a simple matter of right clicking on the Primordial Space in the Storage Pane and selecting new pool, and following the on screen steps.


  7. You then need to create your virtual disks. To do so, right click the Storage Space you wish to create the Virtual Disk on, in this case our Lab Test Pool Gold and click New Virtual Disk. In the Storage Pool Window make sure the correct pool is selected and click next.

    Give the disk a name, we called ours Quorum (this will be explained tomorrow) and as we have the SSD's available we will tick the "Create storage tiers on this virtual disk" then click next.
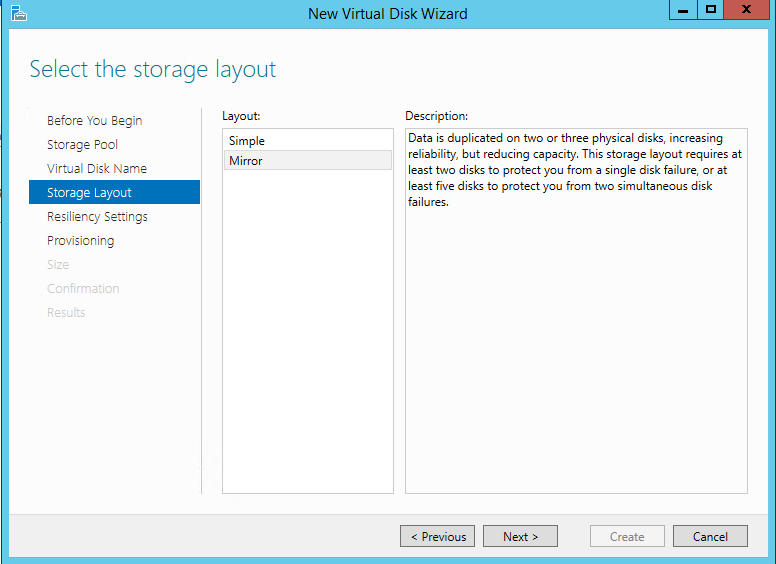
    Then set the storage layout, we have opted for a mirror.
    We will set the resiliency to Two-way mirror and we will keep to the defaults in the provisioning section.
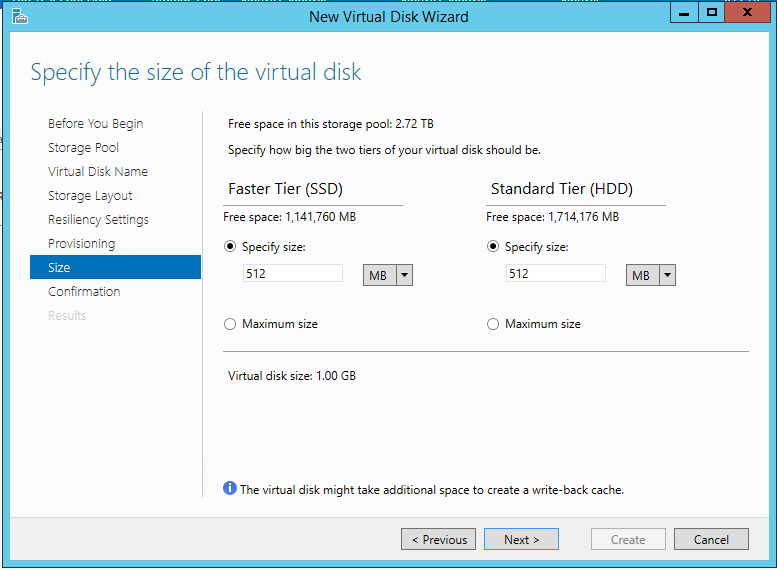
    As we chose the tiers option earlier we will have to select how much SSD and how much HDD we wish to allocate, we have opted for 512Mb of each.
    Its just then a matter of next and confirm.
In the next of these posts we will build the cluster, create the scale out file server and our first shares.

Monday, 16 March 2015

DataOn 1640 - On trial - First impressions

Well having got every thing unpackaged, time for my first impressions. I will also be explaining the lab environment I will be using for my tests.

Hardware

At first glance this is a solidly built piece of kit. I am surprise how compact it is measuring just 470mm deep, it is how ever worth noting this thing is heavy and will definitely a two man install.

All models include dual power supply's but  the model I have on test is the DNS-1640D also includes two SAS I/O Modules for I/O redundancy. I believe all versions come fully populated with drive caddies and adapters to enable the installation of SATA drives are also available.

Each of the SAS I/O Modules has three SFF-8088 SAS connectors. Two are labelled in and one out, although I have been told that they can all be used as either inputs or outputs.  There is also a rj45 socket but the manual says they are for factory use only.

The only real negative I will mention and I do feel I might be being ultra picky I would say the clips on the disc caddy's are a little bit on the flimsy side of things compared with the likes of HP.  Having said that I do not envisage the disks being swapped on a regular basis.

Lab Environment

For my test environment we are using a pair of HP DL360's running Windows Server 2012 r2 as our Hyper-v Cluster nodes which we will be using for our Scale Out File Server. We will be using our existing lab cluster for all of the other required servers such as the DC, and test load VM's.  Below is a diagram of the environment.

Its worth noting we are not trying with this setup to run the performance to the maximum. Quite frankly our lab servers are not up to the job.  We will be concentrating on how this works with Storage Spaces, SOFS and how it well it copes with the downing of a SOFS node.  This will not be an in detail step by step how to but I will try and point you in the right direction of how you could set this up yourselves.

So next time I will explain how we configured our test lab environment.

Thursday, 5 March 2015

DataOn 1640 - On trial for SOFS and Storage Spaces

At work we have been investigating storage solution based on Microsoft Scale Out File Server and Storage Spaces.  We have just managed to scure on loan a DataOn 1640 for test and evaluation along with a selection of disks, cables and HBA's all courtesy of VA Technologies.

We are evaluating this both for internal use and for client deployments. Utilizing Storage Spaces and Scale Out File Server we hope to supplement our HP SAN and Starwind software based solutions we are currently offerings our clients.

VA technologies have shipped us the following:

  • 1 x DataON DNS-1640D - 24 Bay 2.5" 2U Enclosure
  • 2 x LSI - SAS 9207 - 8E 6GB/s HBA's
  • 4 x Startech (1m) External SAS 8088-8088 Cables
  • 6 x Seagate 600Gb 15k 12gbps SAS Hard Drives with Turbo Boost
  • 6 x Seagate 900Gb 10K SAS Hard Drives
  • 3 x Seagate 1200 SSD 800Gb 12gbps SAS SSD
These together with the servers currently in our normal lab enviroment should make for a pretty speedy storage solution. Over the next couple of weeks I will be posting on how the trial goes, and conclusions reached.