- Open Failover Cluster Manager and click on validate configuration. Once the wizard has started click next and on the "Select servers or a cluster page add your two servers, in our case labhv01 & labhv02 and click next.

- As this is a test environment we can just click next and next two start the validation, if this were a live environment we would have to be mindful of the impact of storage validation. Either way its worth noting that validation is a requirement, along with using certified hardware for this to be a supported configuration. The validation will take quite some time so let it complete. Once completed you will get a validation report, ours completed with warning but they were because we had unused network adapters that shared the same address, so we ignored these and after making sure the "create cluster" box was ticked clicked finish to start the build.

- Once the create cluster wizard has started click next and give your cluster a name, we went with labcl01. Its now just a matter of clicking through the next's and you should have a working cluster.

- Now you have your cluster we need to add our silver storage pool (the gold was added for the Quorum disk). This should simply be a matter of selecting storage, Pools and clicking on Add storage pools.

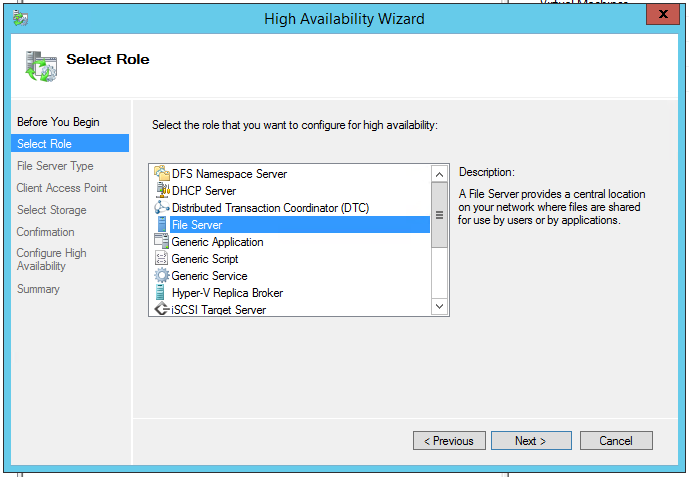
- Its now time to add the scale out file server role. Click on Configure role and once the high availability wizard has started click next and select File server and click next.
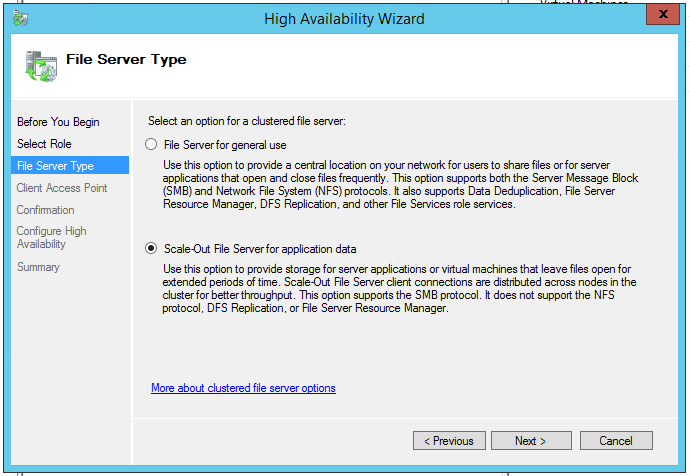
- We now need to pick the type of file server as we are gong to use the share to host vm's we will select Scale-Out File Server for application date.
- Finally we need to give our Scale-Out File server a name, we called ours labsofs01, its then just a matter of clicking next a few times and at the end you will have a Scale-Out File Server.

- Its nearly time to create our file shares but first we need to create a virtual disks and volumes on each of our pools in the same way as we did before. I opted for a two way mirror for the Gold and parity for the Silver. Make sure you add the volumes to the new SOFS not the cluster or the nodes!
- To create your shares, right click on your Scale-Out File Server and click add new file share. On the file share profiles select applications and click next.

- Select your server (labsofs01) and the volume you wish to share, in this case volume2 which is our Gold storage.

- Give you share a name, gold in our case and click next a couple of time an create and you will have a working share on your Scale-Out File Server.

Next time I will go through the results of our testing and my final thoughts on the DataOn 1640.
No comments:
Post a Comment